So I kind of needed to give someone something and I thought I’d try my hand at these–and Gillian Polack is entirely right, they are dead easy to make and so so good! You can replace oranges with any citrus fruit (I kind of want to try lemon now).
Recipe here. I’m not posting a picture of the orangettes (the chocolate-candied peels) because mine ended up looking a bit weird due to coating issues with the chocolate (they still taste great though, but they’re not very presentable!).
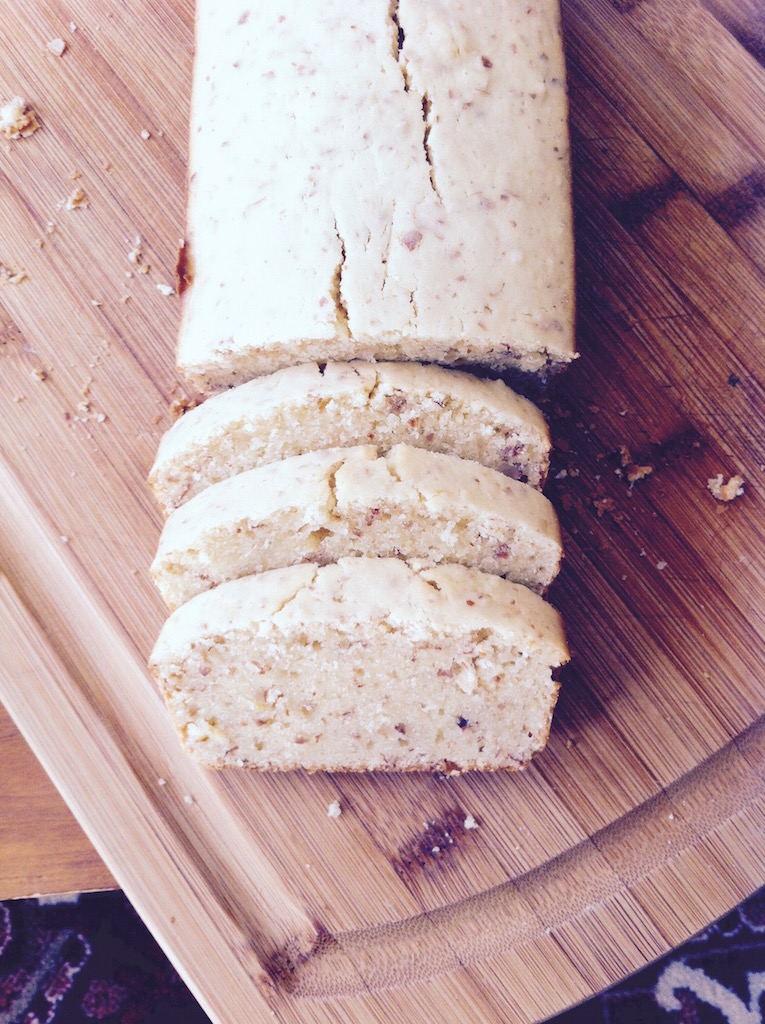
I’ve posted the recipe for an almond, orange blossom and lemon cake that’s just lovely–we made this weekend, and it’s both tart and sweet, rich with the smell of almonds.
And it’s recipe Wednesday again! Except we don’t exactly have recipes, but I figured it was time I did something for this part of the blog. So instead of recipes, we’re going to talk kitchen utensils today.
My idea of a shopping trip for kitchen utensils is Kawa, 89 rue de Choisy in the 13th District. Kawa sells to individuals, but the primary audience is for restaurant owners and cooks, and the kitchen stuff they sell is heavy duty indeed. In addition to crockery, they have woks, rice cookers, spatulas, etc. I got my (very handy) garlic press from them, and their spatulas and wok spatulas are way handier than anything I’ve seen in high-end cookshops (not to mention cheaper).
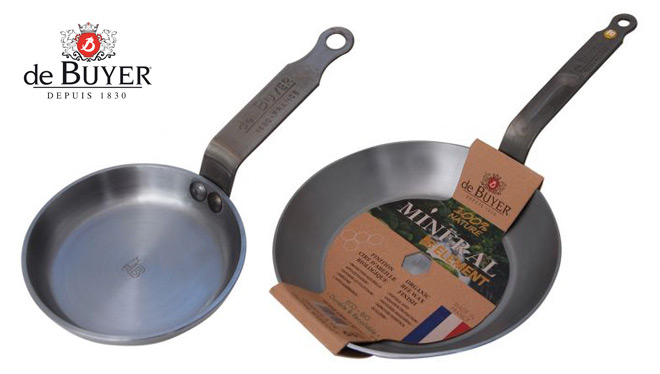
When I dropped by Kawa last time, I was in need of a frying pan to replace our nonstick one after its untimely death; and they had a whole row of carbon steel de Buyer pans.
I’ve never cooked with carbon steel, and all I’ve heard (mostly from cooking boards) made it sound really fiddly–which is a thing I don’t really do (fiddly and fragile are two things I handle badly in a kitchen), but I was also tired of having to replace a frying pan every few years when the teflon died on me. What the heck, I figured. They’re reasonably affordable, and if it doesn’t work out I can always change my mind next go-around.
Turns out I was needlessly worried. The pan is great: it’s a bit heavy (but not as heavy as cast-iron–the one cast-iron pan we do have, a big Le Creuset thing, I almost never use because it’s too much work getting it out onto the stove). It has to be seasoned first, which basically consists of heating up oil just below smoking point on it (the instructions come with the frying pan), and carefully wiping it dry. That’s the start of your patina, which is then developed further by cooking greasy things in it until the entire bottom of the pan turns black.
I found the pan seasoned pretty well: I’m not at the stage where I’ll cook an omelette with just a smidgeon of oil on it, but it’s noticeably slicker already, after just a few uses. Because it’s thin and it’s metal, it also heats up quite fast: it’s a great pan for searing meat. It’s not a pan for cooking without fat, or for frying anything fragile (like, whole fish is out); but for searing or omelettes or anything that requires high temps it’s superb (and because it seizes at truly high temps the meat tastes really good, too).
There’s a bunch of instructions on this that theoretically make it a hassle to handle: do not use an abrasive sponge on it, and clean it with very hot water (and rub with coarse salt if anything gets stuck to it); and dry it and oil it before putting it away. I have to admit neither the H nor I could be bothered to follow these, and the pan has still survived pretty well 🙂 We use a sponge with the green scratchy back, use a moderate amount of soap, and the seasoning has reasonably stuck around so far. For putting it away, I follow advice I’ve seen on the net for carbon steel woks, and dry the pan on a warm stove before putting it away (basically, you want to make sure there’s no humidity on the pan. It might be a problem not to oil it in warmer climes, but in our very dry kitchen it never was an issue).
And, best of all, this is a pan that lasts–no Tefal coating that can flake away, and I know families that still use the ones that belonged to grandmothers. It’s pretty cheap for that price (I got it for 30 euros with a slight discount, normally I think it’s 40). Just be careful: as with all frying pans, the diameter is the outer edge: we got a 24cm-omelet pan, but in reality, the cooking surface is closer to 21cm.
Would I recommend this? I’d definitely get at least one for the kitchen; and see if you like it. It’s a bit fiddly but well worth it.
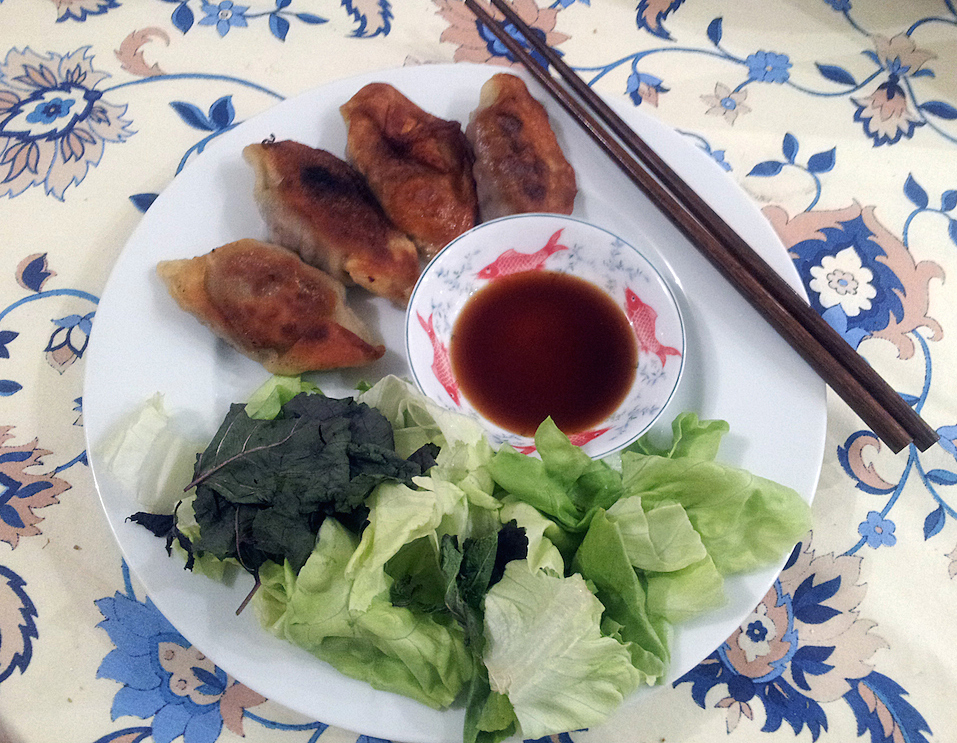
Posted a new recipe at the blog for dumplings, as well as my mini-review of the Dumpling Cube, a contraption that claims to simplify your dumpling making. Does it live up to its promises? Find out all about it here.
Meanwhile, I shall be off to eat my dumplings, yum yum.
A typical kitchen conversation between me and the H (a little bit of context first: we’ve been making biscuit Joconde , a moist sponge cake dough that is used as the basis for many fruit desserts. The recipe we have calls for 3 eggs and 3 egg whites, leaving us with extra egg yolks):
The H: “What can I do with three extra egg yolks?”
Me, googling and perusing a webpage of recipes “Er. Mayonnaise? Aioli? Pasta carbonara? Chocolate mousse?”
The H, paging through our big book of desserts; “Chocolate mousse. Ah no, that’s got cream.”
Me: “You can substitute coconut cream for cream.”
I really should have looked at the recipe before saying this. An hour later and the H is busy mixing eggs and coconut cream, and desperately trying to get the mixture to set.
The H: “Are you positive you can substitute cream and coconut cream?”
Me, getting up and finally looking at the recipe: “Er. Maybe not. And you know that next bit where you beat the cream until it’s solid?”
The H: “Don’t tell me. It doesn’t work with coconut cream.”
Me: “Probably not.”
The H, after another half hour of beating up eggs and coconut creams, staring at a very liquid chocolate mousse. “Hahahaha. Tell you what, I’ll throw it in the freezer.”
And that is how we ended up having chocolate-coconut ice-cream for New Year’s Eve (it does freeze beautiful, actually. The H says he’ll make a note of the recipe for future snakelet consumption).
Aaand part 2 of my 10 kitchen essentials (part 1 is here).
6. Wok: my multi-purpose frying pan. Woks, strictly speaking, don’t really work well on an electric stove–which means I didn’t bother to buy a carbon steel or aluminium or fancy one. Basically, I have a wok-shaped frying pan, which may not exude the breath of the wok but is darn handy for approximate sautéed noodles and various other preparations. The one accessory I did buy was a multi-format lid like this one , which basically fits all our sizes of frying pans. It’s handy for a number of uses, not the least of which is steaming food within the pan.
7. Rice cooker: not worth introducing this one anymore. We bought a really fancy one, but in the end what we mainly use is the rice cooker function, and the steaming basket (very handy for dim sum and bánh bao, which have a tendency to stick like limpets to a metal steamer. Though a trick I saw last Saturday at the Chinese restaurant was putting your dim sum on top of a large carrot slice, which served the double purpose of looking pretty and preventing stickiness).
8. Lemon reamer: I got my wooden lemon reamer from Habitat at clearance prices (my sis will, I’m sure, remember the time when I crossed Madrid on a metro just to buy it 🙂 ). We have (or used to have) a juicer, but it doesn’t work very well on limes or lemons because they’re broadly longer than larger, and the juicer broadly made for oranges which tend to be as long as they are large. I ream a lot of limes because they’re a basic ingredient of the ubiquitous nước mắm dipping sauce; but never really more than a few at a time (otherwise I’d invest in a squeezer or something more appropriate), and it’s nice to have something which helps you get juice out of a lime in one minute flat. My reamer looks a bit like this.
9. Maryse: a maryse is a very particular kind of spatula; I’ve looked around a bit but haven’t found an English equivalent (if any reader of this blog knows, please speak up!) It’s a (flexible) rectangle which enables you to scrape from a pan or salad bowl. It looks a bit like this (the left-hand one; the right-hand one is what we’d call a “demi-maryse”). It’s invaluable for any kind of pastry, as it enables you to get almost all your dough from the bowl where you mixed it (or all your chocolate from the saucepan in which you melted it, etc.), but I’ve also found it handy for cleaning out pans with mashed potatoes or any kind of semi-tough preparation that doesn’t have the good grace to come flowing out of the pan. One of those tools that my husband doesn’t see the use of (he goes for a spoon or a normal spatula), but that I use all the time.
10. Pastry brush: very very handy for making xá xíu pork or for bánh mì chiên tôm (shrimp toast). I got a silicone one because there was no way I was hunting down for bristles in my barbecued pork. It’s one of those things that I don’t use often but that’s really handy to have in the kitchen when I do. Mine is a bit like this, but with a metal handle instead of a wooden one, which means I can chuck it in the dishwasher directly.
And that’s the end of my list. What about you? Other things I’ve missed that you feel should be on this list?
So… I thought it would be a nice addition to the blog to list those items that I use most in the kitchen. By and large, I haven’t listed the really esoteric stuff (and while I do use a food processor from time to time, the H hasn’t yet convinced me that my future lies in embracing it. Mostly because it’s a lot of hassle to clean…). I’ve provided links to amazon, not to endorse stuff, but mostly because short of taking pictures of everything it was the handiest way to show you what my appliances look like (I’m very peculiar about some stuff, as you’ll see).
(and yes, I haven’t been cooking enough to provide a recipe and needed a cooking post. How did you guess?)
1. 13-inch wooden chopsticks: very handy for anything from beating eggs to fishing blanched carrots out of boiling water. There’s much, much larger models for deep-frying and wok cooking, but I’ve always found them rather unwieldy for everyday cooking.
2. Garlic press: I know there’s a big debate on whether it’s a good idea to use a garlic press. As far as I’m concerned, there’s no debate at all. I need chopped-up garlic almost every evening, and I don’t need to make the taste of the garlic milder (who’d want to do that?). I could use item #3 on my list (mortar and pestle) to make a purée, but when I just have a few cloves to mash it’s just easier to reach for the press, which is much lighter and cleans more easily. I got my garlic press from the Chinese district in Paris for a ridiculously low amount of money, but if I had to buy one again, I’d pick one where the grid of small holes detaches (makes it way easier to clean up), and make sure that it’s sturdy enough and heavy enough. Mine looks a lot like this except not at that price point.
3. Granite mortar and pestle: handy for mashing ginger (which I do for about one meal in three or one meal in two), puréeing large amounts of garlic, or grinding spices. I used to have an olive wood one and basically never touched it; for some things you just need stone. I was told that the sound of the pestle hitting the mortar was one way families picked out their future daughters-in-law in Ancient Vietnam: it had to be regular, thereby proving that the owner knew how to cook. Makes sense, seeing how useful the thing is for everyday cooking! Mine is a 5″ model (I think it’s the outer diameter?), which is a nice compromise between being light enough for me to lug it to the sink, and large enough to handle what I put in it. Though if I had to buy another one, I might go for a 6″ model. Looks exactly like this (and probably was imported from the same place).
4. Chopping knife: my weapon of choice here is a 15cm-Santoku knife. The H and I differ quite wildly in our handling of kitchen knifes: he’s used to a chef’s knife, but for some reason the Santoku just sits more easily in my hand (I suspect it’s more congruent with both the shape of my hand as well as what I expect from a knife). I have a metal one; have to admit that if I hit jackpot sell my novel, I might very well invest in a high-quality ceramic one.
5. Angled measuring glass: someone sold me on the 2-cup Oxo angled measuring glass a couple years ago, and I haven’t looked back. Compared to my old measuring glass, it has three advantages. One is that the angle makes it much easier to see what you’re measuring from above as well as from the sides; the second is that it’s handily graduated in imperial and in metric (my old glass, like many French glasses, was by weight of what you were measuring, like flour or chocolate or sugar); the third is that the metric scale indicates the first 10 mL (which is really useful for small amounts of liquid and avoids me juggling with tablespoons and teaspoons). I see, though, that the version for sale on amazon.com doesn’t really seem to have #3 on my list, which is odd?
And that’s all for this week–tune in next week for the next five items on the list 🙂
What about you? What items couldn’t you do without in the kitchen?
So… this weekend’s cooking experiments saw me invading the kitchen of my in-laws and making chả giò (fried rolls). It’s actually a lot more fun to have victims, er, helping hands I mean, to take on some of the work involved in making the rolls. Making the stuffing and wrapping the rolls is about 90% of the work, and for me alone it’s usually a good half-day’s work. Here we made short work of the 30+ rolls in under 2 hours; I understand now why making this (and making dumplings) is a communal activity!
We also got to try out my in-laws’ Philips Airfryer, which deep-fries food with a minimal amount of oil: in this case, the H kindly brushed all the rolls with frying oil (which was some work :p), and we then studied the problem of how to adapt the recipe to an Airfryer. First attempt was dumping rolls in the Airfryer basket and cooking them at 200°C for 20 minutes, flipping them once during cooking. This proved effective but time-consuming: the basket could only take 6 or so rolls, and 20 minutes is a long time when you’re already hungry. We then switched to an intermediate method: cook the rolls in a 200°C-oven for 20 minutes, until they just start to turn golden. Then dump them 6 by 6 in the Airfryer basket, and cook them at 200°C for 4 minutes on each side. Much, much more effective.
The final result doesn’t *quite* look like it’s been deep-fried, but I have to say it’s not too shabby, and the rolls tasted great!
(also, the H now wants us to do dumplings in the Airfryer. I think he enjoyed the entire thing a bit too much :p)